Hiring looks simple on paper.
Post a job, screen candidates, run interviews, and make an offer.
But in reality, it rarely works that way.
Candidates drop off, feedback gets delayed, roles stay open longer than expected, and every stakeholder seems to follow a slightly different version of the process. What looks like a structured hiring journey often turns into a series of disconnected steps.
This is exactly where a hiring process flowchart helps.
Not just as a visual diagram, but as a decision-based system that shows how hiring actually moves forward in real scenarios. It helps teams stay aligned, define ownership, reduce delays, and bring consistency to a process that is otherwise chaotic.
In this guide, you will learn:
- What a hiring flowchart should actually include
- Why most flowcharts fail in modern hiring
- How to build one that reflects real-world complexity (with a template)
- And how to turn it into a system your team can actually follow
What is a hiring process flowchart, and why is it important?
A hiring process flowchart visually represents the steps your company adopts to reach talent. It is a decision-based map that shows how hiring actually moves forward in real scenarios.
This makes it easy for you and your team members to remain on the same page since you can understand a recruitment flowchart at a single glance.
Why do companies use hiring flowcharts
Here are some of the key benefits of using a hiring process flowchart:
- You can avoid lengthy conversations and keep team members aligned.
- You can also add a responsible person for each step in the flowchart for more clarity.
- Allows you to build a consistent structure for hiring across your organization to avoid missing crucial steps.
- Reduces redundancies and time to hire and ensures effective use of resources with clear communications.
- You can identify the policies already in place and implement them to get the best results.
What a good hiring flowchart should include
Instead of simply outlining steps like sourcing → screening → interviews, a good flowchart captures what happens at each step based on outcomes.
For example, whether a candidate is rejected, moved forward, or kept in a pipeline for future roles.
This makes the flowchart more than documentation.
A strong hiring flowchart goes beyond basic stages and includes the elements that make it usable in real hiring workflows:
1. Stages + decision points (if/then paths)
It should map both the process and the logic behind it.
For example:
- If the candidate clears the screening → move to the interview
- If not → reject or move to talent pool
2. Ownership (who does what)
Every stage should clearly define responsibility.
- Recruiter: sourcing and initial screening
- Hiring manager: interviews and final decision
- HR/ops: offer and onboarding
3. Timelines / SLAs
Each stage should have a defined timeline.
For example:
- Resume screening: 48 hours
- Interview feedback: 24 hours
4. Tool / ATS integration
A flowchart should align with the tools your team actually uses. This includes your ATS, CRM, sourcing tools, and communication platforms.
Key Stages in a Hiring Process Flowchart: Define the Steps Clearly
1. Hiring Approval & Workforce Planning
First, teams need to align on why this role exists and what outcome it should drive.
At this stage, teams define the following:
- Business need → What goal does this hire support (revenue, delivery, expansion, efficiency)?
- Capability gap → What skills or outcomes are currently missing in the team?
- Headcount & budget → Can the business justify and afford this role?
- Timeline & urgency → Is this critical now or planned for future growth?
Action steps
- Run a 30-minute intake discussion with stakeholders
Focus on outcomes, not responsibilities. Ask what success looks like in 3–6 months.
- Write a 2–3 line “business case” for the role
Clearly define what impact this hire will create (e.g., reduce turnaround time by 20%, support X revenue goal).
- List 3–5 must-have capabilities (not job titles)
Keep it focused on skills or outcomes instead of creating a long wishlist.
- Define success metrics early
Document what success looks like in the first 30/60/90 days.
- Confirm budget and seniority level upfront
Align on compensation range and role level before moving forward.
- Get approval before opening the role
Avoid starting sourcing without sign-off to prevent delays later.
2. Identify hiring needs and draft the job description
The goal at this stage is to define the problem, not just the position.
What specific roles or skills does the general workforce need to improve the overall output of the business?
To identify the needs:
- Review existing skills, performance, and workload to identify where gaps or bottlenecks exist.
- Ask: What are we trying to achieve in the next 3–6 months? Then map roles needed to support that.
- Focus on missing capabilities (e.g., “data analysis”) instead of jumping to job titles.
Consult team leads, as they know real on-the-ground challenges and upcoming needs. This allows you to gain an overview of their daily activities, the qualifications required for the job, and the kind of experience you should look for.
Based on this knowledge, draft the job description and differentiate core skills from the ones that are nice to have.
Best practices for drafting JDs:
- Define work and compensation expectations
- List only must-have skills (avoid long lists).
- Keep language simple and jargon-free
- Highlight impact of the role (why it matters)
- Avoid bias-heavy or exclusionary language
Once the JD is finalized, publish the job posting across multiple channels for maximum reach and visibility.
Action steps:
- Run a 30-minute intake call focused on outcomes, not tasks
- Document 30/60/90-day success expectations
- List 3–5 must-have criteria + 2–3 failure signals
- Get a hiring manager's sign-off before moving. forward
- Keep requirements in the JD realistic and focused
- Publish job posting across multiple channels
3. Decide sourcing channels (active and passive)
Since top candidates only remain available 10 days before they get hired, you need to adopt proactive measures to source ideal candidates before your competitors find them.
This is why you must consider multiple channels to attract your ideal fit for the vacant roles.
Use a focused mix of 2–3 sourcing channels, such as job boards for inbound, referrals for quality, and outbound sourcing for targeted talent.
Some of the key channels to include for sourcing are:
- Social media platforms, especially LinkedIn
- Job boards like Indeed, Glassdoor, Craigslist, etc
- Employee referral programs
- Job advertisements
- Campus recruitment events
- Job fairs
You can use ATS analytics to measure the effectiveness of each sourcing channel you use. By tracking where candidates are coming from so you can double down on high-performing channels.
Once you've identified the right channels, reach out to candidates with personalized messages that reference their experience, achievements, or work, and clearly communicate the impact they can make in the role.
Also, instead of treating referrals as one-off requests, build a structured referral system. Encourage employees to consistently share candidates, track referral quality, and create simple workflows to capture and evaluate referrals.
Action steps:
- Choose 2–3 sourcing channels per role (e.g., LinkedIn, referrals)
- Create a short, personalized outreach template
- Track source-wise performance (quality > quantity)
- Build a pipeline before moving to screening
4. Candidate Pipeline Management
This stage is about building and maintaining a ready-to-hire talent pipeline of qualified candidates.
Once candidates start coming in, the goal is to track, manage, and move them efficiently through each stage without losing momentum.
A strong pipeline includes the following:
- Active applicants
- Previously screened candidates
- Referrals and passive talent
This is where your ATS becomes critical, acting as the central system to manage the entire pipeline.
How to execute this stage:
- Track and centralize all candidates in an ATS, ensuring every applicant, past candidate, and referral is stored in one place with clear visibility into their current stage and history.
- Define clear pipeline stages (e.g., Applied → Qualified → Screening → Interview → Offer) and consistently move candidates forward to avoid bottlenecks or confusion across the team.
- Pre-qualify and segment candidates early based on must-have skills, experience, and role fit, so your pipeline remains high quality and reusable for future roles instead of starting from zero each time.
- Continuously build and nurture your pipeline by sourcing even when roles are not open and staying in touch with strong candidates through timely updates, follow-ups, or relevant opportunities.
- Maintain speed and consistency by setting internal SLAs (like screening within 48 hours), tracking drop-offs, and ensuring candidates are regularly updated to prevent losing top talent midway.
- Re-engage past and passive candidates through personalized outreach, using previous interactions or interests to turn warm leads into active candidates quickly.
Action Steps:
- Centralize all candidates in your ATS
- Define and standardize pipeline stages
- Pre-qualify and tag candidates early
- Nurture and re-engage past & passive talent
- Move fast and track drop-offs consistently
How to execute this stage:Talent pipeline management 2.0: Building and nurturing relationships for future hiring needs
5. Analyze the screening and assessment process
Screening is where most inefficiencies and biases creep in. Without a structured approach, decisions are often based on gut feeling rather than evidence.
Start by reviewing how candidates are currently screened or are decisions based on structured criteria or gut feelings? Then look at your assessments: do they actually test what the role requires, or are they generic?
For assessments, add a short, role-specific assessment directly in the application and make sure the assessment directly matters to the role with moderate difficulty. Keep assessments under 30–45 minutes to avoid drop-offs
The goal with adding an assessment is to help you filter faster and ensure you don’t miss high-potential candidates who may not look perfect on paper.
When It’s Important
- Skill-heavy roles (engineering, design, content, data)
- High application volume roles (to filter candidates at scale)
- Early-stage or lean teams (saves time by reducing unnecessary interviews)
- When resumes are unreliable signals (e.g., junior roles, career switchers)
- Roles directly impacting revenue/product
When It’s NOT Important
- Senior/leadership roles (better assessed via interviews)
- Relationship-driven roles (better assessed via interviews)
- Low application volume roles (easily manageable with manual screening)
- Urgent hiring with tight timelines
Also, use AI screening to filter candidates with speed and consistent candidate scoring.
Make sure your AI scoring is bias-free and detailed, so your assigned human reviewers can step in and make the final call with proper context.
The idea is to screen faster so you don’t lose top talent due to delays in process.
As Lorna Erickson, Hiring Manager Coach, mentions,
“The companies that are excelling in “speed to hire” are the ones using AI to screen, schedule interviews, and deliver feedback. Candidates and most hiring managers don’t want AI making decisions for them, but the companies that are using AI tools are the ones who will have access to the best talent.”
Action Steps:
- Add a short, role-specific assessment
- Keep tests relevant and under 45 mins
- Use AI for fast, consistent screening
- Add human review for final decisions
6. Optimize your interview process
An ideal interview process is structured, consistent, and purpose-driven.
For structured interview process, here are three key things to consider:
- Reduce interviews to 2–3 focused rounds
- Design interview stages that progressively validate the candidate from different angles.
- Beyond asking the right questions, define what to evaluate and score candidates consistently against it.
Follow these exceution steps:
- Define 5–8 core competencies required for the role
- Break each competency into clear, observable behaviors
- Specify what each competency actually means for the role (e.g., system design = tradeoffs, scalability, complexity)
- Design 2–3 focused interview rounds mapped to competencies
- Create a standard scoring scale (e.g., 1–5 with defined levels)
- Ask questions that directly test each competency
- Evaluate candidates based on evidence from responses
- Record structured scores and feedback after each round
- Decide what type of tests your company needs, whether work samples, cognitive ability tests, behavioral tests, or job trials.
- Reevaluate the potency of the tests you create to suit changing times.
- Give candidates clear instructions to tackle the tests to enhance their overall experience.
What teams actually need for this process:
- A shared competency framework for each role
- Standardized interview scorecards (no free-form feedback)
- Clear interviewer training on how to evaluate and score
- A system to capture and compare candidate data centrally (ATS/scorecards)
- Strong alignment between recruiters and hiring managers before interviews start
- Defined decision criteria (what qualifies as a hire vs no-hire)
Action Steps (Summary)
- Define core competencies + scoring criteria upfront
- Limit to 2–3 structured interview rounds
- Use standard scorecards for consistent evaluation
- Align interviewers before starting the process
- Make fast decisions using structured data (not gut)
7. Interview Debrief & Decision Stage
Teams must conduct the debrief immediately after the interview, ideally within a few hours. Delayed feedback often turns into vague opinions, while same-day discussions capture details and honest reaction
This is how teams should execute the process:
Step 1: Start with the candidate debrief (for optimizing candidate experience)
- Ask how they felt the interview went
- Understand what stood out to them (positive or negative)
- Identify anything they think didn’t go well
- Gauge their interest in moving forward
- Capture any new questions or concerns
Step 2: Move to the hiring manager debrief (for decision-making).
- Ask for overall impressions and initial reactions.
- Evaluate strengths and red flags
- Check confidence level (strong yes, no, or unsure)
- Identify missing information or concerns
- Understand if they’re ready to make a decision
Step 3: Move into the decision point (for final decision)
- Compare feedback across interviewers (if multiple rounds)
- Review scorecards or evaluation criteria
- Align on one of three outcomes: Move forward/ Reject/ Collect more data (another round or assignment)
Action Steps:
- Schedule the debrief immediately after the interviews
- Use a standard set of debrief questions for consistency
- Document feedback in the ATS immediately
- Define clear decision criteria (what qualifies as a “yes”)
- Assign ownership for driving the final decision
8. Run reference and background checks
Background and reference checks primarily are to validate key information, not to discover new signals.
Reference and background checks help you validate claims, assess soft skills, and gain deeper insights into the eligibility of your candidates to do great work.
It allows you to combine details from public records and recommendations from past employers to understand candidates better.
This way, you can prevent yourself from making costly mistakes by hiring the wrong person.
Here are some tips to consider when checking:
- Defining a clear background check policy—what you check, for which roles, and how results impact decisions. Choose checks that are relevant to the role (e.g., employment verification for all roles, credit checks only for finance roles).
- Before running checks, always inform the candidate and get consent, and clearly communicate what will be checked and why. Once checks are initiated, focus on verifying key details like employment history, education, and any role-specific requirements (e.g., licenses, criminal records if applicable).
- Avoid making binary decisions. Instead, contextualize findings—consider the nature of the role, the severity of any issue, and how recent it is. Finally, ensure your process follows legal and compliance requirements (consent, adverse action steps, non-discrimination), as background checks are regulated.
9. Offer Approval, Negotiation & Candidate Communication
Before sending an offer, teams must finalize internal details and perform consistent communication with all candidates (selected or not) to maintain a strong candidate experience and employer brand.
Action steps:
- Finalize compensation, role level, and approvals from finance/HR to avoid delays after decision-making.
- Align on expectations like salary, role scope, and timelines to increase offer acceptance chances.
- Share timely updates on status, next steps, or delays to keep candidates engaged and informed.
- Close the loop with candidates who didn’t make it
10. Make a job offer and onboard
At this stage, you want to ensure that your job offer is irresistible to make sure you successfully onboard most of your eligible candidates.
Once you are sure a candidate is suitable for your organization, reach out within 24–48 hours of the final decision.
Before sending the formal offer, pre-close the candidate by confirming the expectations, check for competing offers, and align on compensation.
Once aligned, send a written offer letter with all terms (salary, benefits, timelines, reporting manager, etc.) and a clear deadline for acceptance.
Here are practical ways to speed up the job offer process:
- Prepare offer details in advance (salary band, approvals, template)
- Get pre-approval from finance/HR before final interviews
- Make the offer the same day or within 24 hours of decision
- Use a standard offer letter template (no drafting delays)
- Set a clear decision deadline for candidates
- Use e-sign tools for faster acceptance
- Keep one point of contact (no back-and-forth confusion)
The onboarding process should be treated as a structured 30–90-day process, not just a Day 1 activity.
The goal is simple: help the new hire become productive quickly, feel confident in their role, and integrate smoothly into the team.
Follow this plan to execute the onboarding process smoothly:
Step 1: Complete Pre-Onboarding Setup
- Send offer docs and collect required details
- Complete all compliance and verification steps (contracts, payroll details, background checks, role-specific requirements).
- Set up email, tools, and system access
- Prepare the workstation/equipment.
- Share first-week plan and expectations
Step 2: Run Day 1 Onboarding
- Give team intro + company overview
- Walk through tools, systems, and workflows
- Assign small starter tasks
- Assign an onboarding buddy
Step 3: Execute First Week Plan
- Provide a clear task roadmap
- Schedule daily check-ins
- Introduce key stakeholders/teams
- Start role-specific training
Step 4: Set Expectations & Goals
- Define 30-60-90 day goals
- Align on responsibilities and priorities
- Share success metrics
Step 5: Run Ongoing Check-ins & Integration
- Conduct check-ins at Day 1, Week 1, Month 1, Month 3
- Ensure all documentation, payroll, and access are complete
- Review progress and adjust goals if needed
Action steps:
- Pre-close candidates and align on expectations before sending the offer
- Roll out offers quickly (within 24–48 hours) with clear terms and deadlines
- Streamline approvals and use templates and e-sign tools to avoid delays
- Treat onboarding as a structured 30–90 day process, not just Day 1
- Set clear goals, check-ins, and early success metrics for new hires
11. Track your hiring process performance
Most teams track activity such as the number of applications, messages sent, interviews conducted. But these don’t tell you if your hiring process is effective.
What matters is how candidates move through your funnel and whether those movements lead to successful hires.
To do this properly, you need to separate two things:
- KPIs (outcomes) → Are you hiring well?
- Supporting metrics (diagnostics) → Why is your hiring performing this way?
For example, a low offer acceptance rate is a KPI problem, but the real issue could be poor candidate experience, slow feedback, or misaligned expectations earlier in the process.
Instead of trying to track everything, focus on a few high-impact areas:
- Hiring efficiency (how fast you close roles)
- Sourcing effectiveness (which channels actually work)
- Hiring quality (are the right people joining and staying)
- Candidate experience (are candidates engaged throughout the process)
For a deeper breakdown of exactly which KPIs to track and how to measure them, check out this guide: 15 Key Recruiting KPIs For Hiring Team
Why Hiring Flowcharts Fail Today (And Must Adapt to Modern Recruitment Complexity)
1. Hiring is driven by decision trees, not fixed steps
In reality, candidates don’t move forward in a predictable sequence. Every stage introduces conditional logic shaped by candidate quality, urgency, and role complexity.
- A strong candidate may skip the initial screening
- A borderline candidate may go through additional evaluation rounds
- A rejected candidate may re-enter the pipeline for a different role
In high-demand or hard-to-fill roles, recruiters often adapt the process in real time. Modern hiring flowcharts must capture these “if-this-then-that” paths, where decisions drive movement.
2. The hiring pipeline is no longer just stages—it’s a system
Hiring today functions as a continuously moving pipeline inside ATS and CRM systems.
Candidates are:
- Moving across multiple pipeline stages
- Being nurtured over time (especially passive candidates)
- Re-engaged for future roles
This becomes even more important in competitive markets where candidate drop-offs and long decision cycles are common. For example, long hiring timelines can lead to loss of candidate interest, forcing recruiters to re-engage or restart parts of the process.
Your flowchart must align with how this system actually behaves, not just how it’s documented.
Otherwise, there’s a clear disconnect between the following:
- The process teams think they follow
- And the process that actually runs inside the ATS
3. External dependencies add parallel workflows
Modern hiring rarely happens within a single, self-contained team. Companies increasingly rely on:
- Recruitment Process Outsourcing (RPO) partners
- External sourcing agencies
- Offshore or distributed hiring teams
These introduce parallel workflows and waiting points, such as:
- Delays in receiving candidate pipelines from external partners
- Coordination gaps between internal and external stakeholders
- Dependency on external screening or sourcing cycles
At the same time, outsourcing and distributed hiring are becoming more common as companies try to expand talent access and reduce hiring costs, adding further complexity to coordination.
A linear flowchart cannot capture these interdependencies, it assumes control where there often isn’t any.
4. Sourcing is no longer a single entry point
Modern hiring operates across multiple sourcing channels simultaneously, including:
- Referrals
- Social media and employer branding
- Talent communities
- Events, campus hiring, and offline channels
- Passive candidate outreach
In fact, a significant percentage of candidates now rely on platforms like social media to discover opportunities, making sourcing far more distributed than before.
This creates multiple entry points into the same pipeline, where candidates enter at different stages and require different engagement strategies.
5. Additional evaluation layers increase process depth
As roles become more specialized and hiring risks increase, companies are adding more evaluation layers to improve decision quality. These include:
- Multiple interview rounds
- Skill assessments
- Background and compliance checks
- Stakeholder reviews
At the same time, recruiters are also expected to:
- Reduce time-to-hire
- Improve candidate experience
- Maintain fairness and reduce bias
These competing pressures make the process deeper and more complex, meaning your flowchart must be flexible.
How to Actually Build Your Hiring Flowchart that Handles Modern Recruitment Complexity (Step-by-Step)
1. Start by defining your recruitment stages (think systems, not just milestones)
Map your hiring process at a high level, account for multiple entry points, and parallel workflows.
Instead of assuming a single linear journey, identify:
- Core stages (screening, interviews, offer, etc.)
- Different ways candidates enter the pipeline (applications, referrals, sourcing, events)
- External touchpoints (RPOs, agencies, talent pools)
For example, your stages may still look like hiring approval, identifying hiring needs, sourcing channels, interview assessments, etc. But now you’re defining them as part of a broader hiring system, not a single path.
2. Turn those stages into a flexible flow (not a rigid sequence)
Once you have the stages, connect them, but avoid forcing a perfect sequence.
Instead of a single storyline, think in terms of the following:
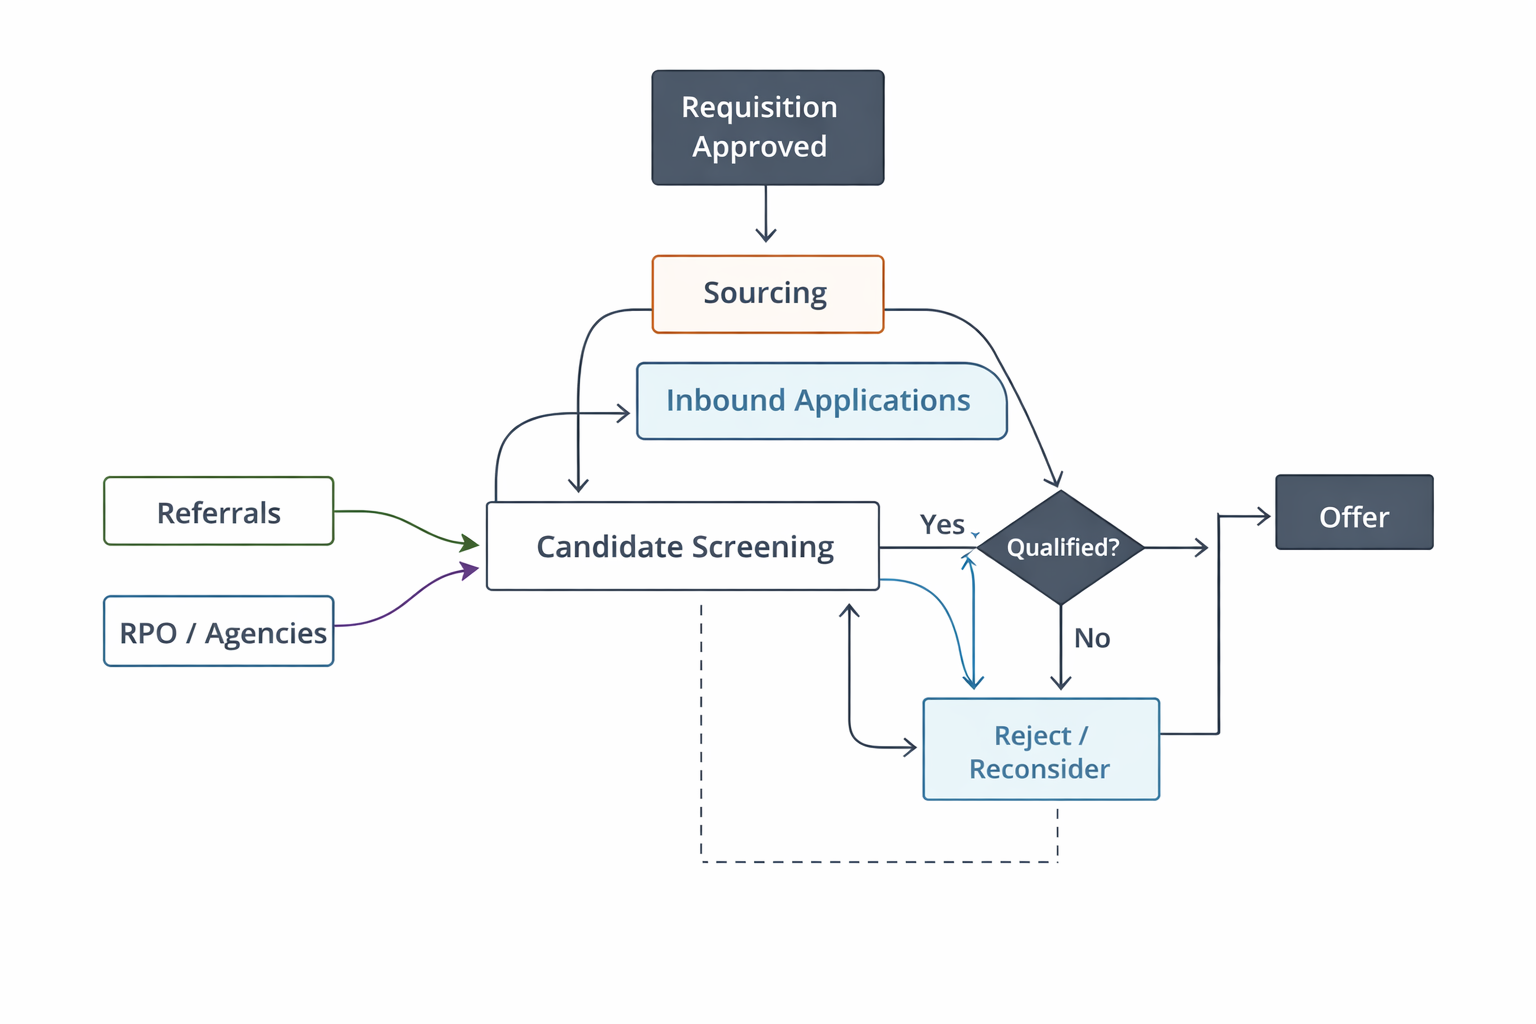
- Multiple starting points (e.g., sourced candidate vs applicant)
- Parallel movements (e.g., screening happening while sourcing continues)
- Dependencies (e.g., waiting for RPO pipelines or hiring manager feedback)
Ask:
- What are the different ways hiring starts?
- Where do parallel processes run?
- What steps depend on external inputs?
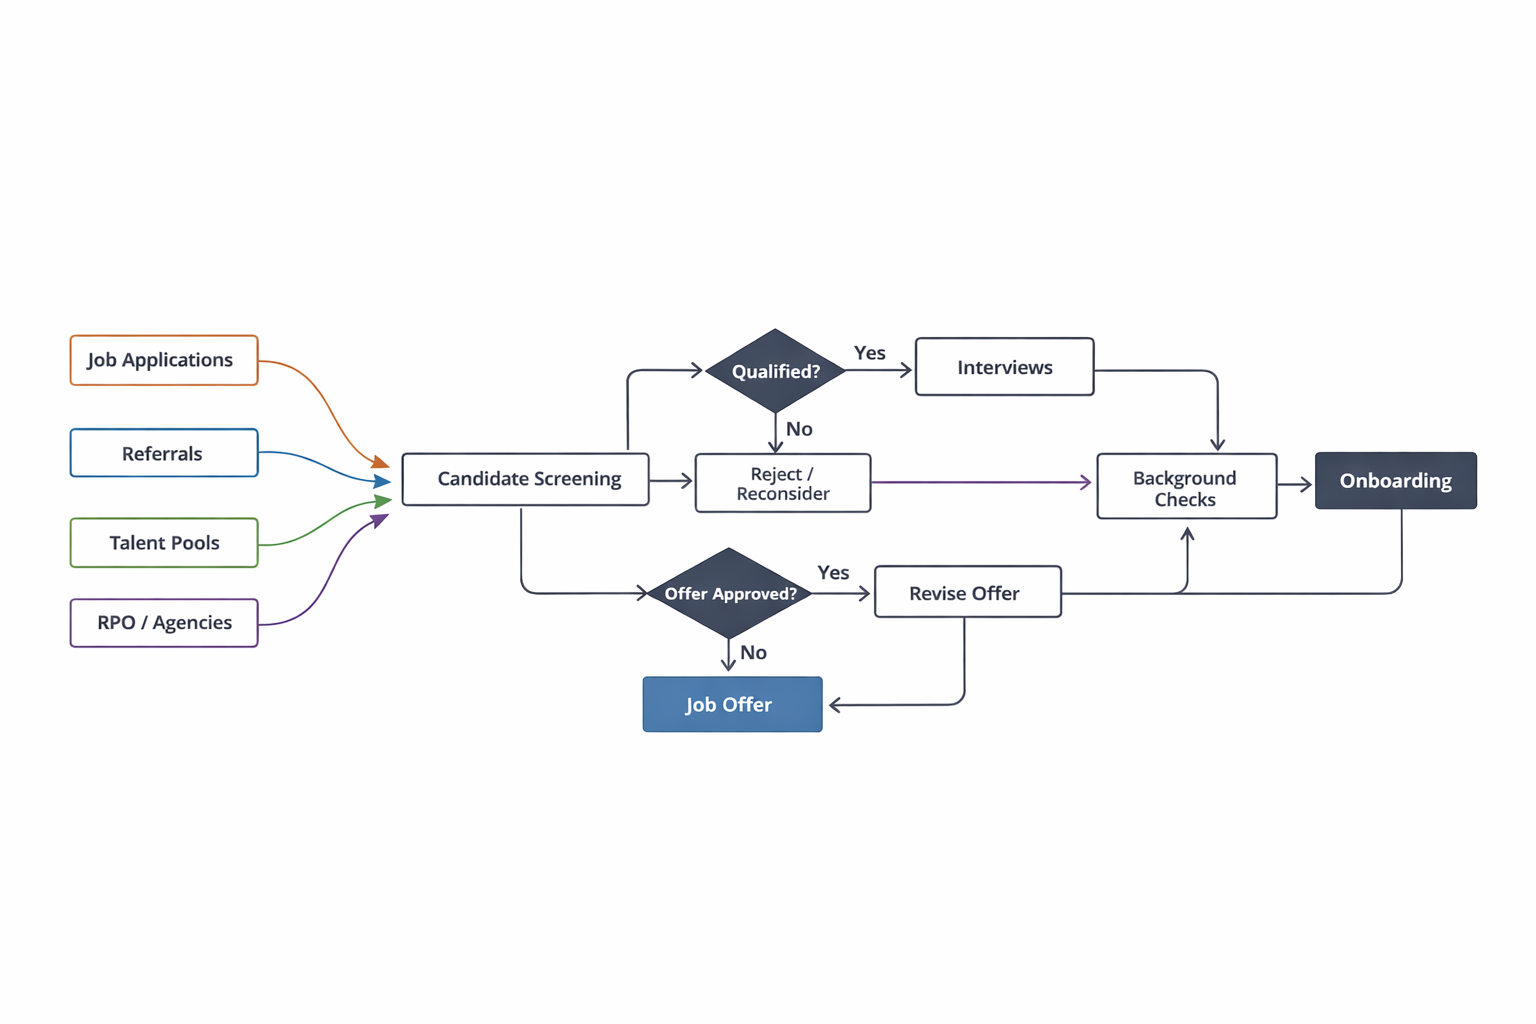
Your flow might now look like:
- Requisition approved → (Sourcing + inbound applications happen simultaneously)
- Candidates enter screening from multiple sources → Interviews → Offer
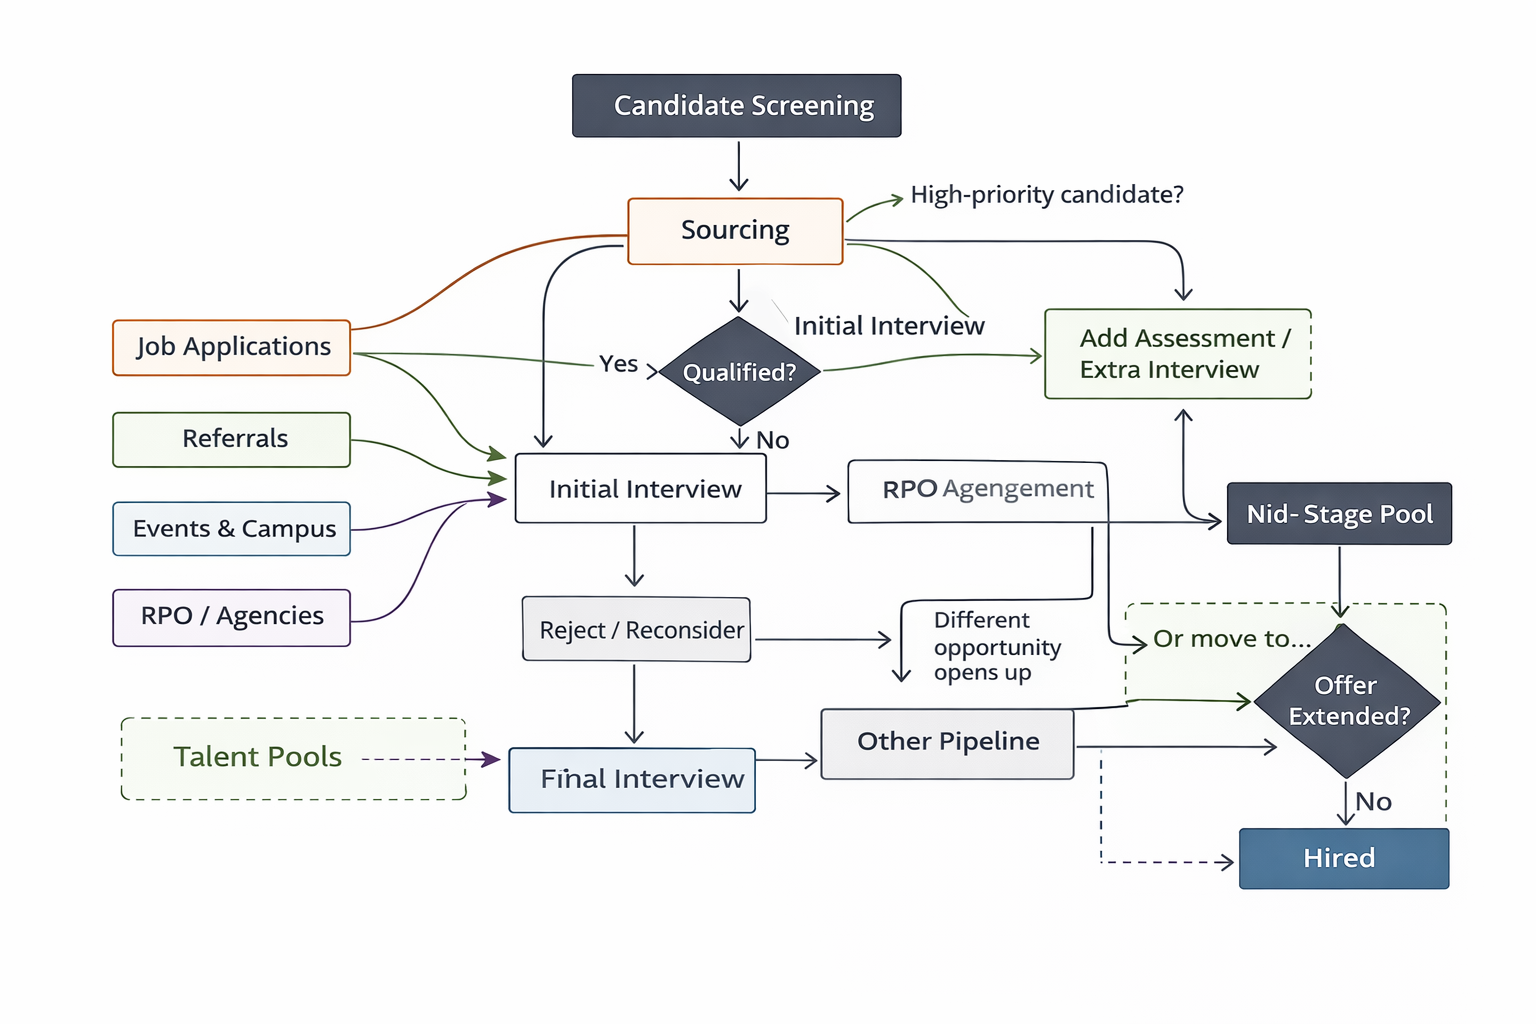
3. Add decision logic (build real-world pathways, not ideal journeys)
This is where your flowchart evolves from basic to realistic.
Modern hiring requires layered decision-making, not just yes/no filters.
Go beyond simple checkpoints and maps:
- Fast-tracking (high-quality candidates skip stages)
- Rejection loops (candidate reconsidered for another role)
- Additional evaluations (extra rounds for critical roles)
Examples:
- “High-priority candidate?” → Fast-track to final round
- “Not selected for this role?” → Move to talent pool / other pipeline
- “Uncertain fit?” → Add assessment or extra interview
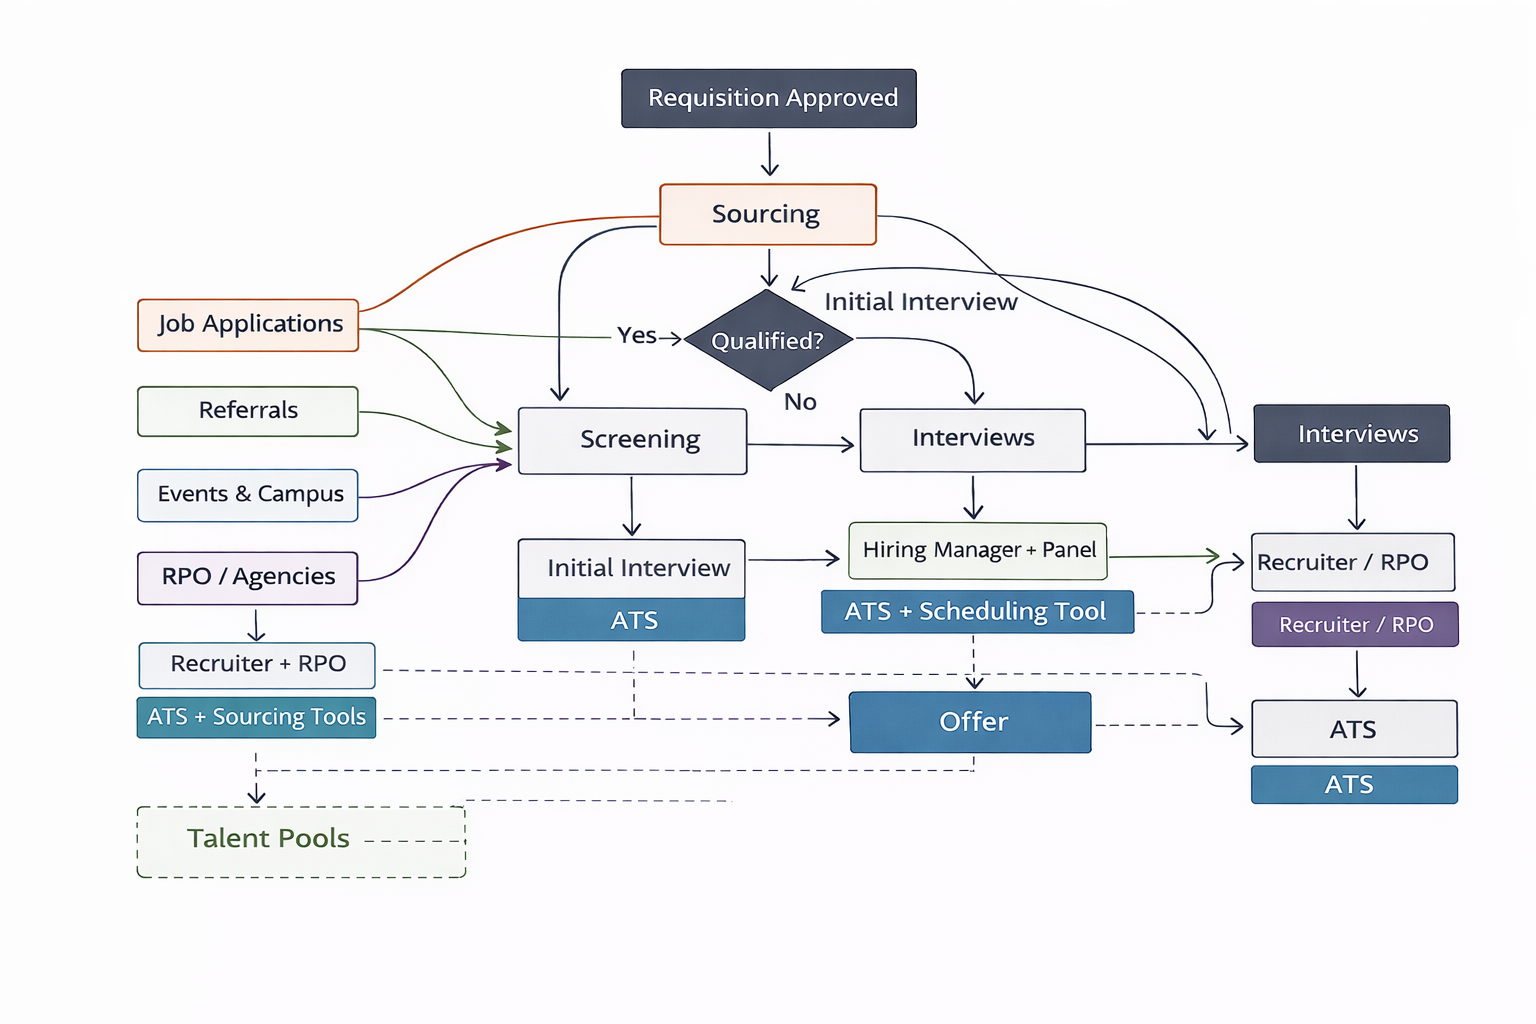
4. Layer ownership, tools, and systems (connect it to execution reality)
In modern hiring, ownership is no longer linear, it’s distributed across teams and systems.
For every stage, define:
- Who owns it? (Recruiter, hiring manager, RPO, panel)
- What system drives it? (ATS, CRM, sourcing tools)
- Where handoffs happen
For example:
- Sourcing → Recruiter + RPO → CRM / sourcing tools
- Screening → Recruiter → ATS
- Interview → Hiring manager + panel → scheduling tool
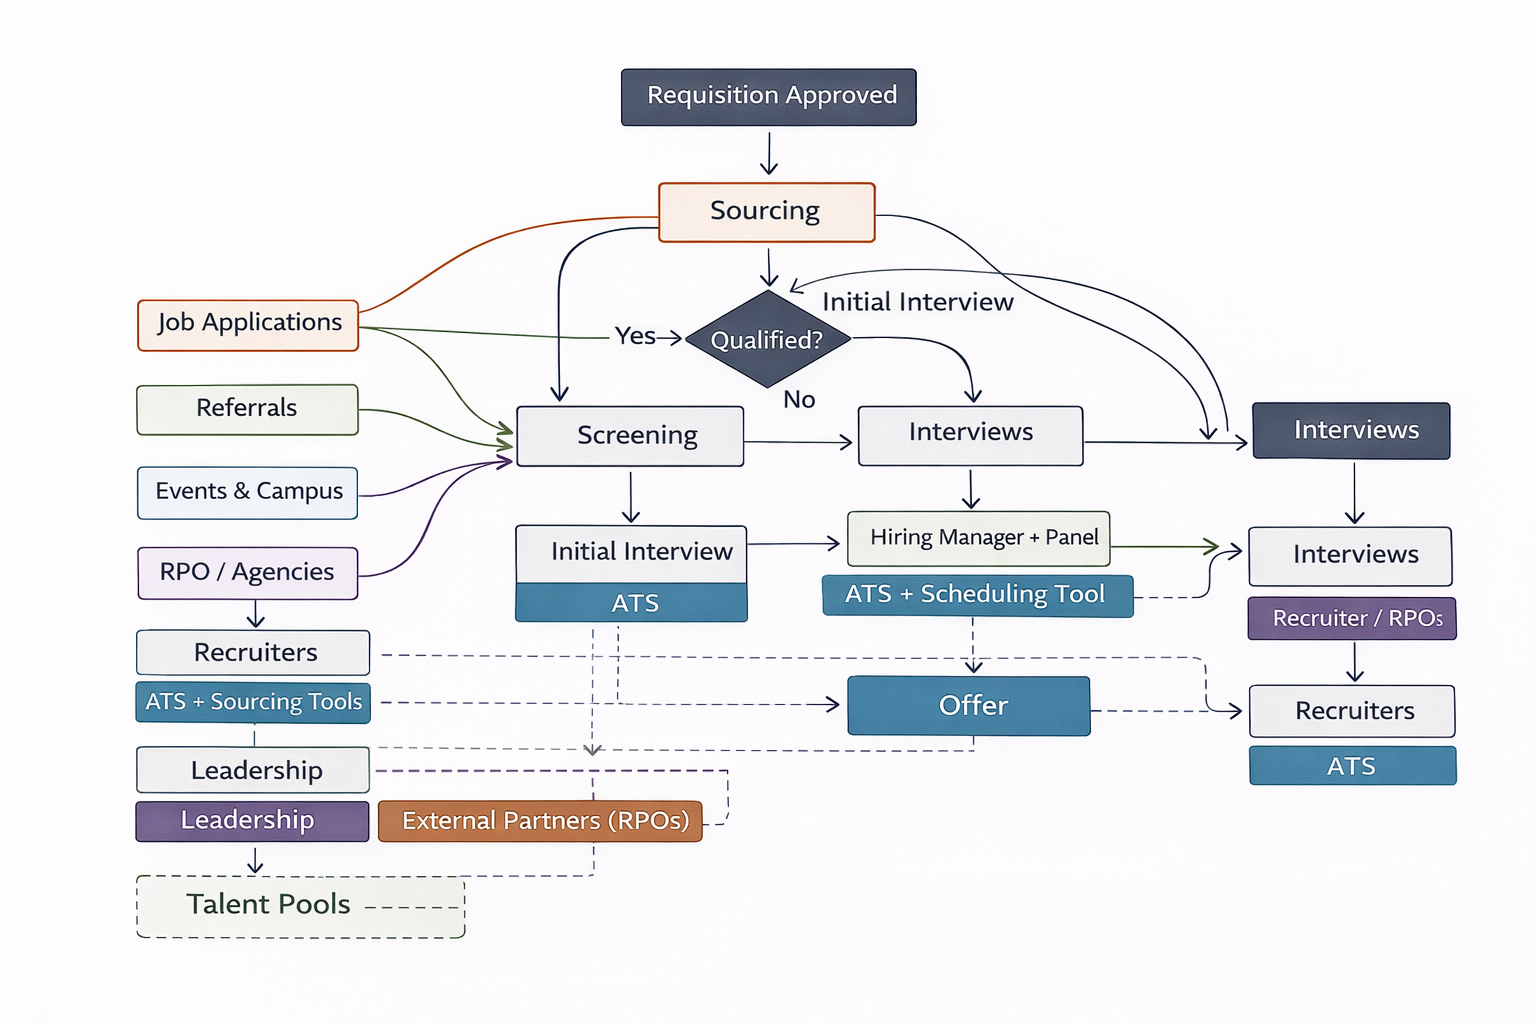
5. Validate it with stakeholders (especially across systems and teams)
Modern hiring involves multiple stakeholders across functions and sometimes outside the company.
So validation must go beyond internal alignment.
Include:
- Recruiters
- Hiring managers
- Leadership
- External partners (if applicable, like RPOs)
6. Turn it into a clean visual (simplify complexity, don’t hide it)
Now convert everything into a flowchart, but with a key shift:
Use:
- Rectangles → stages
- Diamonds → decision points
- Multiple entry arrows → different sourcing channels
- Parallel paths → simultaneous workflows
Avoid forcing everything into a single straight line. Instead:
- Show branches clearly
- Keep flows readable
- Highlight critical decision points
Copy This Hiring Flowchart Template for Your 2026 Hiring Needs
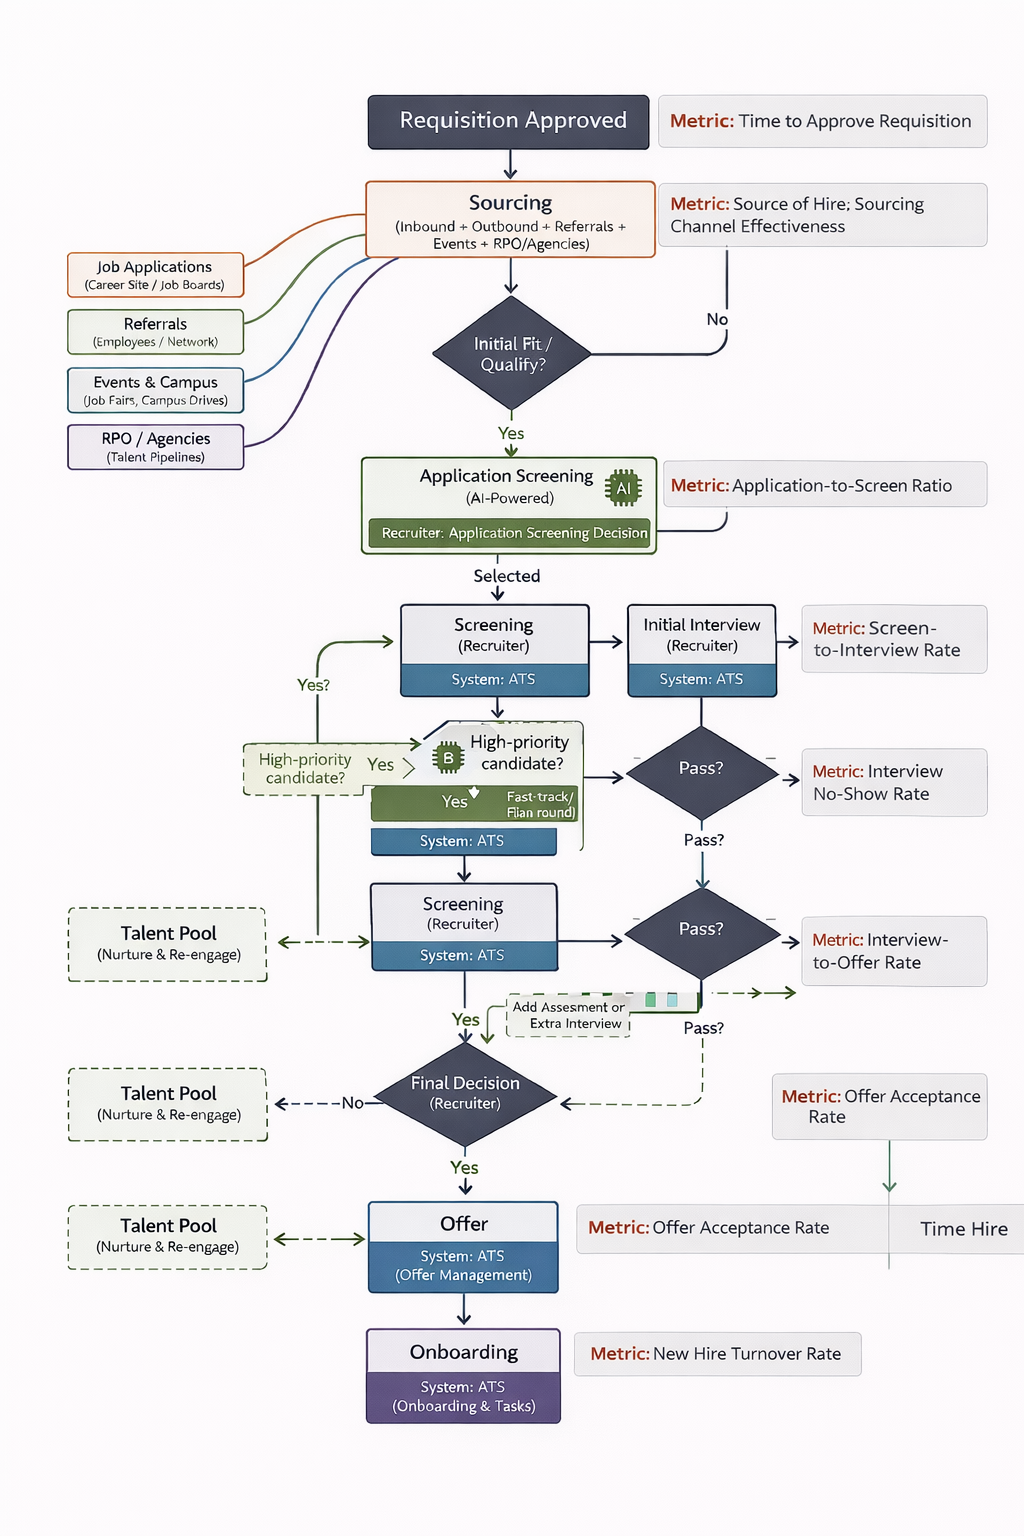
Metrics that make your hiring flow actually work
Track only these five core metrics (nothing more) to implement a hiring flowchart without complexity.
1. Stage Conversion Rates
Stage conversion rates help you understand where candidates are dropping in your hiring funnel and which stage needs fixing.
When to track:
- Weekly (active roles)
- Monthly (overall trends)
Good
Conversion rates are balanced across stages, with gradual drop-offs and no single stage losing a large percentage of candidates.
Bad:
A sharp drop at any one stage indicates misalignment in screening, interviews, or candidate expectations.
How to use it (strategy):
- Low screening → interview → fix screening criteria or sourcing quality
- Low interview → offer → fix interview evaluation or competency mapping
- High drop-offs → fix candidate experience or expectation mismatch
Common mistakes to avoid:
- Tracking overall conversion but ignoring stage-level leaks
- Blaming the source when the issue is actually interview quality
2. Time to Hire
Time to hire shows how quickly you are able to move candidates from application to offer acceptance and whether your process is fast enough to secure top talent.
When to track:
Weekly (active roles)
Monthly (overall trends)
Good:
Consistent and predictable hiring timelines across roles
Bad:
Long or highly variable timelines, indicating delays in decision-making or process inefficiencies
How to use it (strategy):
High time to hire → identify slow stages and fix bottlenecks
Delays in feedback → set SLAs (e.g., 24–48 hrs)
Slow decisions → align stakeholders earlier
Common mistakes to avoid:
Tracking overall time but not breaking it down by stage
Adding more interview rounds instead of fixing delays
3. Time per Stage
Time per stage helps you identify exactly where delays are happening in your hiring process and which step is slowing down the entire flow.
When to track:
For every role during hiring
Especially for high-priority roles
Good:
Even time distribution across stages with no major delays
Bad:
One stage taking significantly longer than others
How to use it (strategy):
Slow screening → standardize or automate
Slow interviews → reduce rounds or align interviewers
Slow offer stage → pre-approve budgets and speed approvals
Common mistakes to avoid:
Trying to optimize all stages instead of focusing on the slowest one
Ignoring approval delays in final stages
4. Offer Acceptance Rate
Offer acceptance rate shows how effectively you are converting selected candidates into hires and whether your closing process is working.
When to track:
Every offer
Monthly trends
Good:
High and stable acceptance rates
Bad:
Frequent offer declines or last-minute drop-offs
How to use it (strategy):
Low acceptance → fix compensation alignment or role clarity
Frequent declines → pre-close candidates earlier
Delays → speed up offer rollout
Common mistakes to avoid:
Treating offer stage as administrative instead of a closing step
Sending offers without aligning expectations beforehand
5. Quality of Hire (3–6 months)
Quality of hire measures how well new hires perform after joining and whether your hiring decisions were actually correct.
When to track:
3-month and 6-month checkpoints
Post-probation
Good:
New hires meet or exceed performance expectations
Bad:
Low performance or early attrition
How to use it (strategy):
Low quality → refine interview criteria and assessments
Mismatch → improve competency definition
High quality → replicate successful hiring patterns
Common mistakes to avoid:
Not linking hiring decisions to post-hire performance
Ignoring the onboarding impact on performance
Execution Gaps in Your Hiring Flowchart to Watch For
1. Hiring plans live in documents, not systems
Most teams define a hiring process in docs, but it never gets operationalized, so every recruiter ends up running their own version. This creates inconsistency and delays.
To fix this, convert your plan into actual ATS workflows: define stages, add scorecards, set SLAs, and automate transitions so every role follows the same process by default.
This way, you also end up centralizing everything in your ATS, which helps ensure every step of your hiring flowchart is followed consistently.
2. No real-time visibility into the pipeline
Without clear visibility, it becomes difficult to take timely action or identify where candidates are getting stuck in your hiring flowchart.
To make your process effective, define 4–5 core metrics that measure stage efficiency and track them consistently to understand what’s working and what needs fixing.
Using an ATS helps by providing centralized dashboards and analytics, making it easier to monitor pipeline movement, spot bottlenecks, and take action in real time.
3. AI adoption is lagging behind
Many recruiters are still in doubt regarding using AI in hiring workflows when 50-75% of recruiter tasks could be automated.
As a result, high-volume tasks like resume screening, interview scheduling, and initial evaluations remain manual, slowing down the entire pipeline.
To fix this, map AI directly to specific stages in your workflow: use AI for top-of-funnel screening, automated scheduling, and structured scoring, while keeping final decisions human-led. This ensures speed without compromising control or quality.
Three high-level inefficiencies that will make all the difference when fixed:
- Transfer your hiring plan from doc to ATS for structured and centralized implementation.
- Define 4-5 relevant metrics and track them consistently in a centralized dashboard
- Don’t fear AI; adopt it to speed up the hiring process for speed and efficiency.
Best Practices for Implementing and Using Your Hiring Flowchart
- Define how long each step should take and set clear deadlines for decisions. This helps prevent delays, keeps candidates moving through the pipeline, and ensures accountability across recruiters and hiring managers.
- Clearly assign who is responsible, who contributes input, and who makes final decisions at each stage. This reduces confusion, avoids delays in feedback, and ensures smoother handoffs across teams.
- Regularly collect feedback from recruiters, hiring managers, and interview panels after each hiring cycle. This helps refine your process, improve decision-making, and keep your flowchart aligned with real hiring scenarios.
- Ensure your flowchart matches how your ATS or CRM actually tracks candidates and stages. If there is a mismatch, teams will not follow the process effectively, leading to gaps between planning and execution.
- Keep core stages and evaluation criteria consistent across roles, but allow room for exceptions like fast-tracking strong candidates or adding extra rounds when needed. This balance keeps the process structured yet adaptable.
- Use the flowchart to onboard new recruiters and align hiring managers on expectations. It provides a clear view of the entire process and helps standardize execution across the organization.
Connect each stage to key hiring metrics such as time to hire, conversion rates, and drop-offs. This allows teams to identify inefficiencies and continuously improve the process.
Your flowchart should be as detailed as you need it to be. Start by adding all major steps such as job description, sourcing channels, interview process, and onboarding. Next, add any other required steps such as pre-assessment tasks or stakeholder feedback rounds. Also, add responsibilities, tag team members, and mention timelines in the flowchart.
Update your flowchart every 6-12 months or whenever your hiring strategy, tools, or compliance requirements change. Reviewing your flowchart helps the team align with all the changing hiring needs.
A hiring flowchart improves candidate experience by creating a faster and more organized hiring process. When your team knows the exact hiring steps and timelines, the process becomes more transparent, and employers are proactive with candidates. Candidates always appreciate smoother interaction with the company.